2015年12月23日 星期三

開發Slackbot的筆記

source: https://github.com/vampirewalk/vanguard

本來是想用swift開發的,但是後來想到Foundation在Linux上還沒實做 (這裡有進度),只好先用Go做了。

Slack Group設定

要先到Group裡的Apps & Custom Integrations加入Bots Integration,在這裡會得到token,等一下會給bot用。

開發

主要用的是https://github.com/nlopes/slack這個library,它實做了slack的Real Time Messaging API,底層走的是WebSocket。做出來的效果嘛,以我的slackbot為例,如下圖,只要在channel裡面貼出github repo的訊息,bot會自動返回repo的語言、star、issue數。

repobot

簡單的範例開始改,ConnectedEvent就是bot連上group,MessageEvent就是bot接收到訊息,依此類推。我的bot就是在MessageEvent把接收到的訊息做分析,如果包含Git repo,就透過https://api.github.com/repos/[user]/[repo]這個endpoint拿到repo的資料,然後再回傳。

Heroku

Bot做好之後要找個雲端放,目前我用Heroku,可以參考https://devcenter.heroku.com/articles/getting-started-with-go#introduction。要讓Go可以在Heroku上跑需要三個步驟

  1. Godep
  2. Procfile
  3. env

Godep

整個project做好後,用godep管理vender code。

godep save -r

Procfile

這邊用的是worker

worker: slackbot

設定env參數

可以透過Heroku的管理介面或是透過command設定

heroku config:set SLACK_TOKEN=YOUR_REAL_TOKEN

然後在Go裡面用下面的方式拿到實際參數,這樣就可以避免在open source時洩漏token了。

token := os.Getenv("SLACK_TOKEN")

本地測試

可以在本地建立一個.env檔,內容就是

SLACK_TOKEN=YOUR_REAL_TOKEN

然後用heroku local測試,這樣一樣可以拿到參數。

注意事項

有一點要注意的是現在bot似乎不能主動加入channel,必須先在channel裡面用invite指令邀請bot進聊天室才能讀到訊息。

/invite YOUR_BOT_USERNAME

2015年12月17日 星期四

一個關於遵循多個Swift 2.0 protocol extension的問題

問題

最近練習用Protocol-Oriented Programming實做可移動以及縮放的View,遇到一個很有趣的問題,假設有以下兩個protocol

protocol Draggable: class {
    var view: UIView { get }
    var initialLocation: CGPoint { get set }
}

extension Draggable where Self: UIView {
    var view: UIView { get { return self } }
    var parentView: UIView? { get { return self.view.superview } }
}
protocol Scalable: class {
    var view: UIView { get }
}

extension Scalable where Self: UIView {
    var view: UIView { get { return self } }
    var parentView: UIView? { get { return self.view.superview } }
}

然後實做一個View遵循這兩個protocol

public class VWView: UIView, Draggable, Scalable {
    var initialLocation: CGPoint = CGPointZero
}

這時候會發生compile error,告訴你
Type 'VWView' does not conform to protocol 'Scalable'
Type 'VWView' does not conform to protocol 'Draggable'

怎麼一回事呢?

原來是因為兩個protocol都有var view: UIView { get { return self } }的default implementations,編譯器不曉得該用哪一個,乾脆來一個編譯錯誤。

解法

其實解決方法很簡單,就是在class裡實做這個值,這樣編譯器就知道該用class裡面的這個了。

public class VWView: UIView, Draggable, Scalable {
    var view: UIView { get { return self } }
    var initialLocation: CGPoint = CGPointZero
}

Reference:
http://stackoverflow.com/questions/31586864/swift-2-0-protocol-extensions-two-protocols-with-the-same-function-signature-c

2015年12月9日 星期三

Parse Cloud Code初體驗

最近在我的App背包客住宿裡需要新增一個上傳住宿資料的功能,由於App是用Parse.com當後端,所以可以選擇用Client SDK直接上傳或是呼叫Cloud Code去管理Data。這次我選擇使用Cloud Code,這樣之後如果要對上傳上來的資料做篩選或是處理都可以立即生效,不用等下一版App上架。

安裝步驟那些就不說了,網路上資料一大把,紀錄幾個自己遇到的問題。

beforeSave

我一開始以為beforeSave會比function早執行,結果卻相反,是先執行function,在儲存前才執行beforeSave。

Geocode

住宿資料上傳前,需要先對Address做Geocode,這個部份可以使用Google Maps API達成,在Geocoding with Google Maps API via Parse Cloud Code這個stackoverflow上的問題有人提供了作法,但是語法跟現在的有點不同,在原答案是用success: error:去分別處理呼叫成功與失敗,現在要用

Parse.Cloud.httpRequest({
  url: 'http://www.example.com/',
  followRedirects: true
}).then(function(httpResponse) {
  console.log(httpResponse.text);
}, function(httpResponse) {
  console.error('Request failed with response code ' + httpResponse.status);
});

then之後接的第一個function處理成功,第二個處理失敗。
一般在Parse Object裡我們會用GeoPoint表示地理位置,那麼從Maps API回來的資料要怎麼轉換為GeoPoint呢?
假設我的Hostel物件有一個欄位叫做location,而它是GeoPoint型別,那麼用下面這樣的轉換方式。

var lat = geocodeResponse.results[0].geometry.location.lat;
var lng = geocodeResponse.results[0].geometry.location.lng;
var point = new Parse.GeoPoint({latitude: lat, longitude: lng});
hostel.set("location", point)

除錯

目前還沒有找到什麼好方法debug,只能在code裡多log,然後在command line用parse log看結果。

console.log(request.params);

2015年12月4日 星期五

Swiftlint - 維護coding style的好工具

https://github.com/realm/SwiftLint

在多人協作開發專案時,遵守團隊訂出的coding style是一個好習慣,可以讓其他協作者更容易看懂我們產出的程式碼。Realm釋出的這個tool就可以幫助我們將專案中不符合coding style的地方用warning甚至是error標出,利用Xcode幫我們自動把關,節省其他協作者幫我們檢查coding style的時間。目前Swiftlint是遵照GitHub’s Swift Style Guide 做檢查。

安裝

brew install swiftlint

設定

lint

在target的run script加入

if which swiftlint >/dev/null; then
  swiftlint
else
  echo "SwiftLint does not exist, download from https://github.com/realm/SwiftLint"
fi

然後在Xcode裡Build專案,哇,怎麼連Pod裡面的code都檢查了呢?

在專案root path新建一個 .swiftlint.yml 檔案,輸入

included:
  - YourProjectSourceDirectiryName

把YourProjectSourceDirectiryName替換成你的專案原始碼資料夾名稱就可以只檢查自己專案的coding style囉。

2015年11月26日 星期四

Swift Optionals

在swift中使用Optional來處理值缺失的狀況,如果看見一個variable是Optional類型,只有兩種可能,要嘛有值,要嘛就是nil。

宣告方式

var coffee:String?

等於下面這種宣告方式

var coffee: Optional<String>

由此可知 ? 其實是syntactic sugar。

看看Optional的原始宣告

public enum Optional<Wrapped> : _Reflectable, NilLiteralConvertible {
    case None
    case Some(Wrapped)
    /// Construct a `nil` instance.
    public init()
    /// Construct a non-`nil` instance that stores `some`.
    public init(_ some: Wrapped)
    /// If `self == nil`, returns `nil`.  Otherwise, returns `f(self!)`.
    @warn_unused_result
    public func map<U>(@noescape f: (Wrapped) throws -> U) rethrows -> U?
    /// Returns `nil` if `self` is nil, `f(self!)` otherwise.
    @warn_unused_result
    public func flatMap<U>(@noescape f: (Wrapped) throws -> U?) rethrows -> U?
    /// Create an instance initialized with `nil`.
    public init(nilLiteral: ())
}

如果沒有賦值的話,Optional的預設值是nil。在Objective-C中,nil是一個0指標,在swift中nil是一個確定的值,任何Optioanl都可以設為nil。關於瞭解空值,可以參考悟空

其他關於Optional chaining以及一些更深度的剖析,可以參考喵神的文章或是玉令天下的Blog

另外有一種情況是如果Optional呼叫的function需要傳入Optional本身,像

class ViewController: UIViewController {

    let finishedMessage = "Network call has finished"
    let messageLabel = UILabel()

    override func viewDidLoad() {
        super.viewDidLoad()

        someNetworkCall { [weak self] in
            self?.finished(self?.finishedMessage)
        }
    }

    func finished(message: String) {
        messageLabel.text = message
    }
}

這一段是編譯不過的,因為self?.finishedMessage是Optional chaining,而Optional chaining回傳的一定是Optional值。那麼應該怎麼解呢?

可以直接使用!,因為當self?為nil時不會繼續呼叫function,所以一旦呼叫了function就代表有值。

someNetworkCall { [weak self] in
            self?.finished(self!.finishedMessage)
}

詳情可以參考http://blog.xebia.com/swift-optional-chaining-and-method-argument-evaluation/

2015年11月4日 星期三

隱藏無內容的Self Sizing Cell

基本上看完优化UITableViewCell高度计算的那些事就可以大概瞭解從iOS7以後計算TableViewCell高度需要注意的事。

假設cell裡只有一個addressLabel,而且我們使用iOS8的self sizing,想讓無內容的cell高度變為0,也就是不顯示,可以把top跟bottom constraint的constant設為0。先把xib或storyboard中上下的constraint拉出IBOutlet到 .m 檔中,在cellForRowAtIndexPath的時候根據內容是否為空決定constant大小。

Constraint

- (UITableViewCell *)tableView:(UITableView *)tableView cellForRowAtIndexPath:(NSIndexPath *)indexPath
{
    static NSString *simpleTableIdentifier = @"ListTableViewCell";

    UITableViewCell *cell = [tableView dequeueReusableCellWithIdentifier:simpleTableIdentifier forIndexPath:indexPath];
    if (cell.addressLabel.text.length == 0) {
        cell.addressLabelTopConstraint.constant = 0;
        cell.addressLabelBottomConstraint.constant = 0;
    }
    else {
        cell.addressLabelTopConstraint.constant = 15;
        cell.addressLabelBottomConstraint.constant = 15;
    }
    [cell layoutIfNeeded];
    return cell;
}

addressLabel如果沒有內容,因為Label約束與上下邊緣一致 (constant為0),所以Label高度會被自動計算為0,且不會佔任何空間。

2015年10月30日 星期五

在iOS App裡加入Fan page與App Store link

Screenshot

在App裡面,我們經常會需要連結到自己的粉絲團,或是App Store頁面請使用者評分。
接下來講解怎麼實做。

連到粉絲團

下面這一段code的思考模式是這樣,我們會先用canOpenURL去檢查使用者是否安裝了Facebook app,
若有則用原生的facebook app開啟粉絲團頁面,若無則使用safari去開啟行動網頁。
如果不知道自己的粉絲團id可以使用 http://findmyfbid.com/ 查詢。

NSURL *facebookAppLink = [NSURL URLWithString:@"fb://profile/yourid"];
NSURL *facebookURL = [NSURL URLWithString:@"https://m.facebook.com/yourid"];

if ([[UIApplication sharedApplication] canOpenURL:facebookAppLink]) {
    [[UIApplication sharedApplication] openURL:facebookAppLink];
} else {
    [[UIApplication sharedApplication] openURL:facebookURL];
}

在iOS9你很可能會遇到這樣的錯誤

CanOpen[2255:1002610] -canOpenURL: failed for URL:
 "fb://" - error: "(null)"

這裡要特別注意的是,在iOS9之後必需要在info.plist裡面設置LSApplicationQueriesSchemes,
這樣canOpenURL才會回傳YES,沒有設定他只會回傳NO。所以要到info.plist裡面加入
LSApplicationQueriesSchemes,新增一個fb item,類別是String,這樣就可以了。

scheme

圖片裡有很多item是因為我有整合facebook登入,如果要打開粉絲團頁面其實只需要fb那個就可以。

App Store頁面

網路上有很多人採用openURL的方式來打開App Store連結,如下所示。
但我個人覺得這個方式打開的速度有點慢,因為它會先打開safari,然後再跳轉到原生App Store裡面,
大概會lag幾秒,使用者體驗不是很優。

NSString *iTunesLink = @"itms://itunes.apple.com/us/app/apple-store/id375380948?mt=8";
[[UIApplication sharedApplication] openURL:[NSURL URLWithString:iTunesLink]];

其實在iOS6之後就有新增一個SKStoreProductViewController類別可以在App內打開App Store頁面,
不用跳出自己的App就可以讓使用者評分了,這樣感覺是不是好很多了?

首先引入StoreKit,並讓自己的ViewController遵從SKStoreProductViewControllerDelegate。

@import StoreKit;

@interface ViewController : UIViewController<SKStoreProductViewControllerDelegate>
@end

打開頁面

- (void)openAppStorePage
{
    NSString *cAppleID = @"your app id";
    if ([SKStoreProductViewController class]) {
        SKStoreProductViewController *storeViewController = [[SKStoreProductViewController alloc] init];
        storeViewController.delegate = self;
        NSDictionary *dict = [NSDictionary dictionaryWithObject:cAppleID forKey: SKStoreProductParameterITunesItemIdentifier];
        [storeViewController loadProductWithParameters:dict completionBlock:^(BOOL result, NSError * _Nullable error) {
            if (result) {
                [self.navigationController presentViewController:storeViewController animated:YES completion:nil];
            }
        }];
    }

按下關閉時要dismiss目前顯示的頁面。

- (void)productViewControllerDidFinish:(SKStoreProductViewController *)viewController {
    [viewController dismissViewControllerAnimated: YES completion: nil];
}

2015年10月20日 星期二

整合Parse與Facebook登入

其實已經有人整理好一篇文章了,照著步驟做應該沒有什麼問題。不過呢,我們至少要知道為什麼要這樣做。Apple在iOS9預設HTTP必須走TLS1.2,也就是HTTPS的形式。不過看起來目前FB的Server還沒有支援,所以必須設置例外讓連線可以接通。關於ATS以及詳細的資訊可以參考iOS9网络适配_ATS:改用更安全的HTTPS

另外,如果要對UI做本地化(Localization),記得要新增一個ParseUI.strings而不是使用原本的Localizable.strings。

客制化按鈕顏色的話,要先去除backgroundImage再設定backgroundColor。

[self.logInView.logInButton setBackgroundImage:nil forState:UIControlStateNormal];
self.logInView.logInButton.backgroundColor = [UIColor orangeColor];

2015年10月5日 星期一

做一個無限旋轉的UIView

這幾天需要做一個無限旋轉的View,有點像下圖這樣,一個開關控制風扇啟動與停止。

Fan

stackoverflow上找到一篇相關的討論,在所有答案中我最喜歡Nate的答案

// an ivar for your class:
BOOL animating;

- (void) spinWithOptions: (UIViewAnimationOptions) options {
   // this spin completes 360 degrees every 2 seconds
   [UIView animateWithDuration: 0.5f
                         delay: 0.0f
                       options: options
                    animations: ^{
                       self.imageToMove.transform = CGAffineTransformRotate(imageToMove.transform, M_PI / 2);
                    }
                    completion: ^(BOOL finished) {
                       if (finished) {
                          if (animating) {
                             // if flag still set, keep spinning with constant speed
                             [self spinWithOptions: UIViewAnimationOptionCurveLinear];
                          } else if (options != UIViewAnimationOptionCurveEaseOut) {
                             // one last spin, with deceleration
                             [self spinWithOptions: UIViewAnimationOptionCurveEaseOut];
                          }
                       }
                    }];
}

- (void) startSpin {
   if (!animating) {
      animating = YES;
      [self spinWithOptions: UIViewAnimationOptionCurveEaseIn];
   }   
}

- (void) stopSpin {
    // set the flag to stop spinning after one last 90 degree increment
    animating = NO;
}

2015年10月2日 星期五

Objective-C 基本觀念複習

雖然現在Swift已經出到2.0了,但是大多數公司還是使用Objective-C為主力語言。因此,適時複習一下觀念還是很有必要的。網路上有一些不錯的題目,例如 招聘一个靠谱的 iOS面試 iOS 工程師的一些題目如何面试 iOS 工程师?上级向的十个iOS面试问题。也有一些網友給出了自己的解答,例如:https://github.com/ChenYilong/iOSInterviewQuestions 以及 http://www.90159.com/2015/07/26/71/ 還有 http://www.jianshu.com/p/4fea8fa60d75 。不過網路上的答案終究是別人的,唯有實實在在的自己研究過一遍,才會成為自己的東西,共勉之。

下面是一些我蒐集的基本觀念文章,也許可以幫你節省一點找資料的時間。

Property

http://www.devtalking.com/articles/you-should-to-know-property/

Block

http://www.devtalking.com/articles/you-should-know-block/

物件之間的溝通

https://www.objc.io/issues/7-foundation/communication-patterns/

Category

http://tech.meituan.com/DiveIntoCategory.html

KVC, KVO

http://objccn.io/issue-7-3/
http://southpeak.github.io/blog/2015/04/23/nskeyvalueobserving-kvo/

Runloop

http://blog.ibireme.com/2015/05/18/runloop/

Deep copy & Shallow copy

https://www.zybuluo.com/MicroCai/note/50592

Runtime

http://blog.eddie.com.tw/2013/12/05/object-class-and-meta-class-in-objective-c/
http://yulingtianxia.com/blog/2014/11/05/objective-c-runtime/
http://chun.tips/blog/categories/objective-c-runtime/
http://southpeak.github.io/blog/2014/10/25/objective-c-runtime-yun-xing-shi-zhi-lei-yu-dui-xiang/

ARC釋放機制

http://blog.sunnyxx.com/2014/04/02/objc_dig_arc_dealloc/

Autorelease原理

http://blog.sunnyxx.com/2014/10/15/behind-autorelease/

Method swizzling

http://southpeak.github.io/blog/2014/11/06/objective-c-runtime-yun-xing-shi-zhi-si-:method-swizzling/

2015年8月11日 星期二

Mock completion block with OCMock

This is an example unit test using Specta, Expecta and OCMock.
Another example - WordPress iOS app unit test.

#import "Specta.h"
#define EXP_SHORTHAND
#import "Expecta.h"
#import <OCMock/OCMock.h>
#import "RoomListViewModel.h"
#import <EXTScope.h>

SpecBegin(RoomListViewModel)

describe(@"RoomListViewModel", ^{

    __block RoomListViewModel *viewModel;
    __block id home;
    __block id room;

    beforeAll(^{

    });

    beforeEach(^{
        home = OCMClassMock([HMHome class]);
        room = OCMClassMock([HMRoom class]);
        viewModel = [[RoomListViewModel alloc] initWithHome:home];
    });

    it(@"add room with name", ^{
        OCMStub([home addRoomWithName:OCMOCK_ANY completionHandler:OCMOCK_ANY]).andDo(^(NSInvocation *invocation) {
            void(^ __unsafe_unretained completionHandler)(HMRoom *room, NSError *error);
            [invocation getArgument:&completionHandler atIndex:3];
            completionHandler(room, nil);
        });    
        waitUntil(^(DoneCallback done) {
            @weakify(viewModel);
            [viewModel addRoomWithName:@"test" completionHandler:^(NSError *error) {
                @strongify(viewModel);
                expect(...);
                done();
            }];
        });

    });  

    afterEach(^{
        viewModel = nil;
    });

    afterAll(^{

    });
});

SpecEnd
void(^ __unsafe_unretained completionHandler)(HMRoom *room, NSError *error);

Why declare our block __unsafe_unretained?
See http://stackoverflow.com/a/13831074/1060971, Carl Lindberg’s comment.

[invocation getArgument:&completionHandler atIndex:3];

In NSInvocation, argument index 0 is self , index 1 is cmd.
First argument of addRoomWithName is at index 2, completion block argument is at index 3.
So, assign our mock block at index 3.

2015年8月6日 星期四

Xcode6 + Swift 1.2 Podfile

Swift 1.2 + RAC3

platform :ios, "8.0"
use_frameworks!

pod "ReactiveCocoa", '3.0-RC.1'

target :MyAppTests, :exclusive => true do
  pod 'Quick', '0.3.1'
  pod 'Nimble', '1.0.0'
end

2015年7月22日 星期三

在Mac下開發MP4的相關資源

簡介

MP4只是一種container,可以想像成容器,裡面可以放mp3或aac等音樂。
關於MP4格式的spec可以在這裡下載

Library

關於MP4檔案的操作,已經有現成的library可以使用囉~
https://code.google.com/p/mp4v2/

觀察MP4格式的工具

可以藉由atomicparsley這個工具來印出MP4檔案的內部結構

brew install atomicparsley
atomicparsley /path/to/mp4 -T 1

印出來的結果像這樣

Atom ftyp @ 0 of size: 24, ends @ 24
Atom moov @ 24 of size: 569, ends @ 593
     Atom mvhd @ 32 of size: 108, ends @ 140
     Atom iods @ 140 of size: 24, ends @ 164
     Atom trak @ 164 of size: 429, ends @ 593
         Atom tkhd @ 172 of size: 92, ends @ 264
         Atom mdia @ 264 of size: 329, ends @ 593
             Atom mdhd @ 272 of size: 32, ends @ 304
             Atom hdlr @ 304 of size: 33, ends @ 337
             Atom minf @ 337 of size: 256, ends @ 593
                 Atom smhd @ 345 of size: 16, ends @ 361
                 Atom dinf @ 361 of size: 36, ends @ 397
                     Atom dref @ 369 of size: 28, ends @ 397
                         Atom url  @ 385 of size: 12, ends @ 397
                 Atom stbl @ 397 of size: 196, ends @ 593
                     Atom stsd @ 405 of size: 96, ends @ 501
                         Atom mp4a @ 421 of size: 80, ends @ 501
                             Atom esds @ 457 of size: 44, ends @ 501
                     Atom stts @ 501 of size: 24, ends @ 525
                     Atom stsz @ 525 of size: 20, ends @ 545
                     Atom stsc @ 545 of size: 28, ends @ 573
                     Atom stco @ 573 of size: 20, ends @ 593
Atom mdat @ 593 of size: 9, ends @ 602
------------------------------------------------------
Total size: 602 bytes; 22 atoms total.
Media data: 0 bytes; 602 bytes all other atoms (100.000% atom overhead).
Total free atom space: 0 bytes; 0.000% waste.
------------------------------------------------------
AtomicParsley version: 0.9.6 (utf8)
------------------------------------------------------
Movie duration: 7504.597 seconds (02:05:04.60) - 0.00* kbp/sec bitrate (*=approximate)
Low-level details. Total tracks: 1
Trk  Type  Handler                    Kind  Lang  Bytes
1    soun  [none listed]              mp4a  und   1
     0.00* kbp/s  7504.597 sec  MPEG-4 Unknown profile: 0x0    channels: (2)

這個用python寫的工具也是不錯的選擇
https://github.com/amarghosh/mp4viewer
mp4Viewer

2015年3月10日 星期二

讓Alcatraz支援Xcode 6.2

  1. 打開Finder,跳到~/Library/Application Support/Developer/Shared/Xcode/Plug-ins
  2. 右鍵點plugin,顯示套件內容
  3. 打開Info.plist
  4. 在DVTPlugInCompatibilityUUIDs的Array加入A16FF353-8441-459E-A50C-B071F53F51B7
  5. 重啟Xcode

參考:https://github.com/supermarin/Alcatraz/issues/218

2015年2月11日 星期三

支援眾多video與audio格式的MobileVLCKit

支援格式

支援的video格式https://www.videolan.org/vlc/features.php?cat=video
支援的audio格式https://www.videolan.org/vlc/features.php?cat=audio

安裝方式

By CocoaPods

pod 'MobileVLCKit'

從night build下載
http://nightlies.videolan.org/build/ios/

Build source code,使用-f參數build出包含所有arch的framework

./buildMobileVLCKit.sh -f

https://wiki.videolan.org/VLCKit/#Building_the_framework_for_iOS

Sample Code

參考範例DropIn-Player http://cl.ly/0G2Y2M1R1X3U

初始化

記得引用MobileVLCKit的原始檔要從.m改為.mm,這樣編譯才不會出錯。

// Set up a videoView by hand. You can also do that in the nib file
   videoView = [[VLCVideoView alloc] initWithFrame:[[window contentView] bounds]];
   [[window contentView] addSubview:videoView];
   [videoView setAutoresizingMask: NSViewHeightSizable|NSViewWidthSizable];

   // Init the player object
   player = [[VLCMediaPlayer alloc] initWithVideoView:videoView];
   VLCMedia *media = [VLCMedia mediaWithPath:@"/to/my/movie"];
   //設置delegate等一下可以知道歌曲有多長
   media.delegate = self;
   [player setMedia:media];
   [player play];

控制播放進度(progress)

progressValue為UISlider傳過來的值

- (void)seek:(float) progressValue
{
    [self.mediaPlayer setPosition:progressValue];
}

顯示目前播放進度

[[NSNotificationCenter defaultCenter] addObserver:self selector:@selector(mediaPlayerTimeChanged:) name:VLCMediaPlayerTimeChanged object:nil];
- (void)mediaPlayerTimeChanged:(NSNotification *)aNotification
{
    self.playbackTime = [_player.time stringValue];
}

獲取duration

如果有把player裡面的VLCMedia設置delegate的話,就會收到通知

- (void)mediaDidFinishParsing:(VLCMedia *)aMedia
{
    //更新duration
}

監控狀態

[[NSNotificationCenter defaultCenter] addObserver:self selector:@selector(mediaPlayerStateChanged:) name:VLCMediaPlayerStateChanged object:nil];
- (void)mediaPlayerStateChanged:(NSNotification *)aNotification
{
    VLCMediaPlayerState state;
    switch (state) {
        case VLCMediaPlayerStatePaused:
            break;

        case VLCMediaPlayerStateStopped:
            break;

        case VLCMediaPlayerStateBuffering:
            break;

        case VLCMediaPlayerStatePlaying:
            break;

        case VLCMediaPlayerStateEnded:
            break;

        case VLCMediaPlayerStateError:
            break;

        default:
            break;
    }
}

2015年1月31日 星期六

在iOS上開發UPnP相關App的資源

說實在的iOS上的UPnP資源有夠難找,大概是因為比較少人做的關係吧,加上如果下錯關鍵字保證是找好幾天找不到什麼東西,就算找到了也不知道能不能達成自己需要的功能,因此就產生了這一篇,希望幫助那些仍在迷途中的靈魂們。

UPnP Control Point Library

顧名思義這邊列出的library主要是做control point的

CyberLink4C
用C語言實現的library,有提供objective-c的wrapper,但並沒有包含全部功能,例如event的部份就需要使用到c api。

Platinum
這是一個以C++實現的解決方案,一樣有提供objective-c的wrapper,control point跟DMS都可以做。注意這個library預設是GPL授權的,如果商業使用需要申請商業授權。

upnpx
核心是C++,加上Objective-C API。VLC for iOS使用了這套library。年代有點久遠,不過堪用。簡單範例可以參考https://github.com/basti2310/upnpx-classes

個人推薦程度 Platinum > upnpx > CyberLink4C

Edit:
兩個新library
UPnAtom
使用swift實現的版本,可以用在Objective-C以及swift專案,目前swift變動很快,production環境不建議使用這個library。

CocoaUPnP
某個開發者因為upnpx無法滿足需求而自己寫的新library,還在非常早期的階段。

UPnP Media Server

Platinum
很多App的Local DMS都是用這套做的,應該沒什麼大問題。
coevo-upnp-server
這個source只能當參考用,年代已經有點久遠,而且裡面有非常多的bug,相信光是要掃雷就會花掉很多時間。

個人推薦程度 Platinum > coevo-upnp-server

順便附上用Platinum做DMS的demo project
https://github.com/vampirewalk/MediaServer

2015年1月29日 星期四

Realm 0.89.0先期研究

近期出現了Realm這個新的mobile database,先做點筆記。
Document: http://realm.io/docs/cocoa/0.89.0/

Subclass RLMObject

// Dog.h
 @interface Dog : RLMObject
 @property NSString *name;
 @property BOOL      adopted;
 @end

 // Dog.m
 @implementation Dog
 @end //none needed

目前Model物件必須subclass RLMObject。RLMObject只能在創建它的thread內使用。

Supported property types

NSString
NSInteger, CGFloat, int, long, float, and double
BOOL or bool
NSDate
NSData
RLMObject subclasses, so you can have many-to-one relationships.
RLMArray < X >, where X is an RLMObject subclass, so you can have many-to-many relationships.

Write

// Create object
Person *author = [[Person alloc] init];
author.name    = @"David Foster Wallace";

// Get the default Realm
RLMRealm *realm = [RLMRealm defaultRealm];
// You only need to do this once (per thread)

// Add to Realm with transaction
[realm beginWriteTransaction];
[realm addObject:author];
[realm commitWriteTransaction];

// Update an object with a transaction
[realm beginWriteTransaction];
author.name = @"Thomas Pynchon";
[realm commitWriteTransaction];

所有對物件的新增修改刪除都必須包在WriteTransaction裡,因為在RLMObject裏的所有ivar都是跟資料庫直接相連的,而不是一般我們習慣的memory。http://stackoverflow.com/a/25002895/1060971 說明了所有對物件property的修改都會被同步進database。

PrimaryKey

在設計Model物件時,PrimaryKey絕對是不可或缺的property之一。在不同的thread之間無法互相傳遞RLMObject使用,因為RLMObject只能在創建它的thread內使用。所以我們只能透過在非main thread查詢到物件的PrimaryKey,然後把PrimaryKey傳到main thread,然後再

[MyObject objectsWhere:"primaryId IN %@", idArray];

獲得一個新的RLMObject,然後才在main thread使用這個新的RLMObject。
參考:https://groups.google.com/d/msg/realm-cocoa/naRBh-WMet0/ONPvTCGaSUkJ

產生primary key的方式常見有兩種,一是流水號,二是uuid。
產生流水號的method在multi-thread環境下記得保證其thread-safe,否則很可能會產生相同的流水號。
uuid的話,在multi-thread環境下直接產生就好,因為衝突機率很小。

[[NSUUID UUID] UUIDString];

參考:http://stackoverflow.com/a/26257616/1060971

Multi async task completion block

假設現在有一些task需要去執行,在method裡面我們想等所有task完成再call completionBlock,那麼可以分兩種情況
1. task是synchronous的
2. task是asynchronous的

1比較好解決,用NSOperationQueue加dependency就OK了,2的話需要用到dispatch_group_t group。

範例:AVAssetExportSession的exportAsynchronouslyWithCompletionHandler方法是用來把iPod Library中的音樂轉成檔案用的。

- (void)exportAsynchronouslyWithCompletionHandler:(void (^)(void))handler;

現在我們選擇了一批歌曲轉出,想要在全部歌曲轉完之後收到通知並呈現UI,但是AVAssetExportSession不提供一次轉多個歌曲,我們只能知道個別task完成的時間,但是不知道哪時候全部完成,那麼要如何在全部轉完之後才收到通知呢?
這時候就可以使用dispatch_group_t group等待group裡的task統統完成再執行收尾工作。

- (void) convertMediaItemsToMp3:(MPMediaItemCollection *) collection completionBlock:(void(^)()) block
dispatch_group_t group = dispatch_group_create();

    NSArray *songs = collection.items;
    for (MPMediaItem *song in songs) {

        dispatch_group_enter(group);

        AVAssetExportSession *exporter = [[AVAssetExportSession alloc]
                                      initWithAsset:asset
                                      presetName: AVAssetExportPresetAppleM4A];
        exporter.outputFileType = @"com.apple.m4a-audio";
        exporter.outputURL = ...; 

        [exporter exportAsynchronouslyWithCompletionHandler:^{
            dispatch_group_leave(group);
        }];
    }
    dispatch_group_notify(group, dispatch_get_global_queue(DISPATCH_QUEUE_PRIORITY_DEFAULT, 0), ^{
        if (block) {
            block();
        }
    });

http://stackoverflow.com/a/20910658/1060971

2015年1月16日 星期五

使用Instrument找出被retain無法釋放的instance

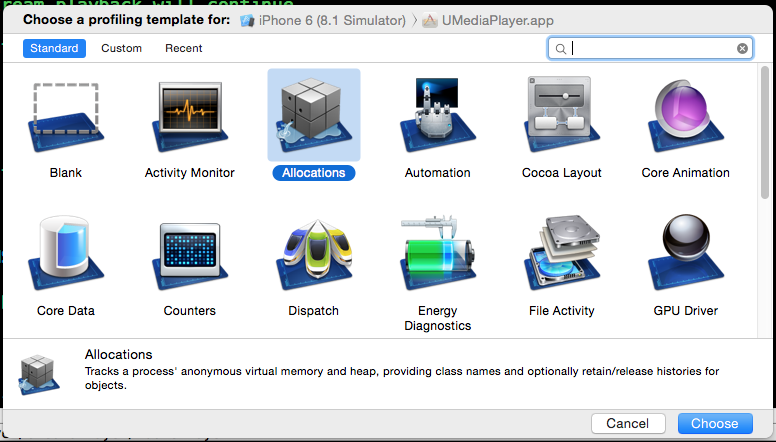
使用⌘+I叫出Instrument
選擇allocation
allocation

看右邊的面板,勾選Record reference counts
Record reference counts

然後開始檢測程式,執行那些你懷疑有問題的動作。執行完後在搜尋框輸入你要找的Class名稱。
滑鼠移到在Category那欄的物件名稱後面會有小箭頭,點進去,出現所有instance,再找要研究的instance一樣點小箭頭。
Search

進去之後會出現所有retain跟release的紀錄,上方標籤選unpaired可以列出沒有成對的retain或是release。
選擇懷疑有問題的那一行,在右邊面板選擇第三個頁籤,可以看call stack。
reference count

這次我遇到的問題是KVOController的block retain自己所在的instance,下次要記得unobserve。
還有使用[[FBKVOController alloc] initWithObserver:self retainObserved:NO]才不會retain被觀察的物件。